Introduction
This is a guide for smart card reader and explanation how to perform transactions as a standalone payment terminal.
To find terminal’s user guide follow the links below:
If you have any questions on how to use the terminal or POS device, contact our support team here.
Getting started
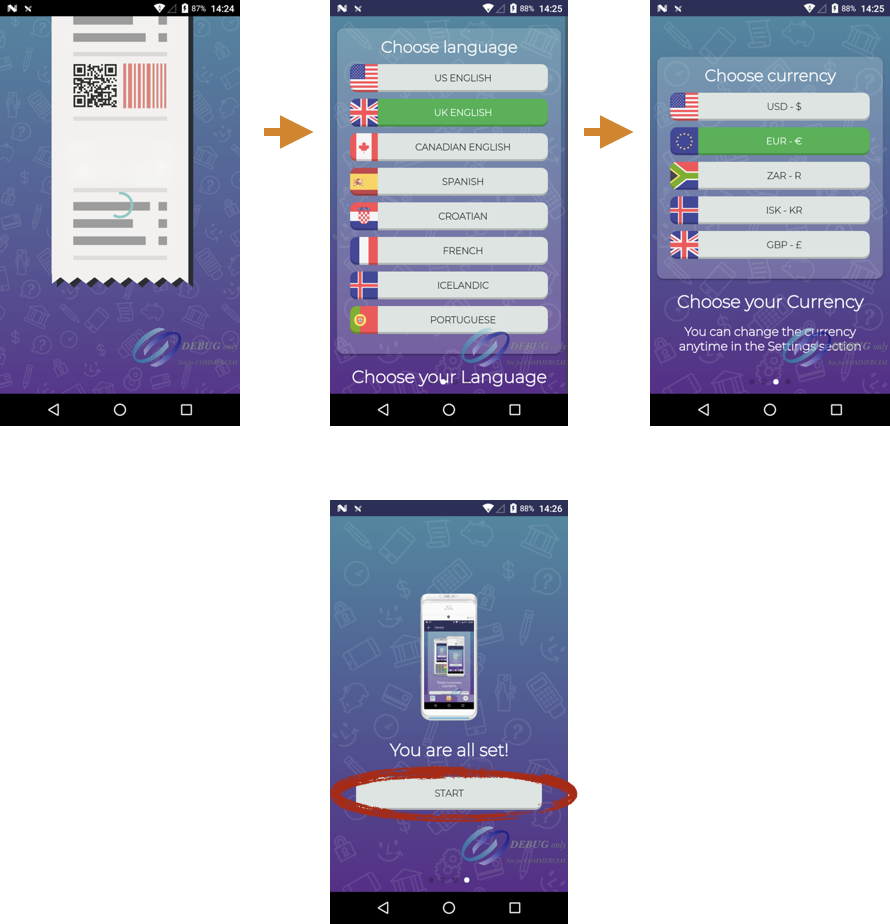
When you start the application for the first time, you will be taken through some configuration screens. You will be able to select the language and currency of the payment terminal and you will need to set a password to protect the reversal and refund functionality of the application.
NOTE: Although the PAX terminal settings menu allows you to set a lock screen password (Swipe, Pattern, PIN, Password), this is a high-risk operation. This lock screen password does not affect the application, i.e. it will not prevent any part of the application from being hidden if the password is not used.
If you forget the lock screen password, you will need to purchase a new terminal as the password cannot be provided or reset.
If you forget your password, contact us and we will reset it remotely.
Taking a Payment
On the bottom of the screen you will find digital keypad that is your starting point to take transactions.

Type in an amount, click CHARGE or choose the payment method for the transaction to start. The payment methods are editable in the settings section (cogwheel).
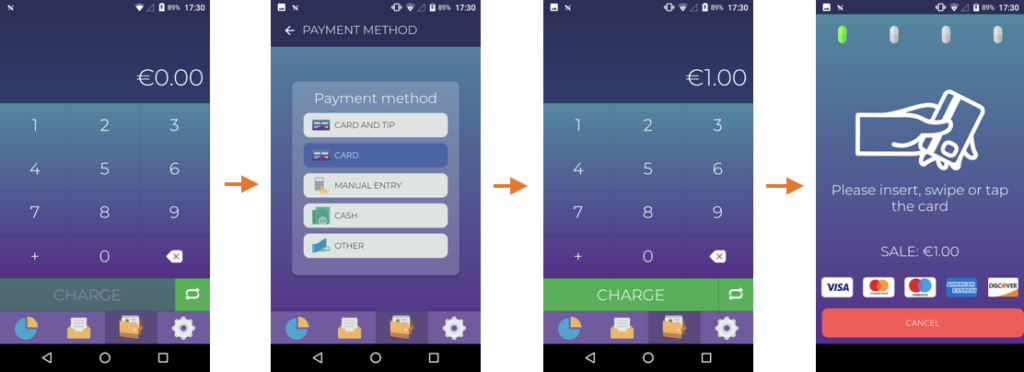
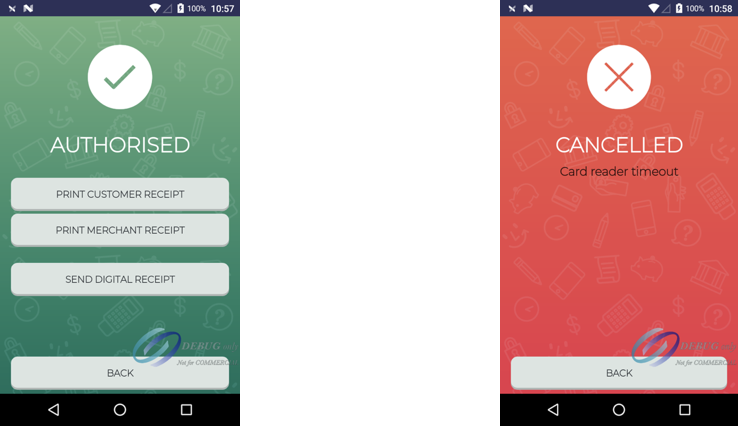
Once the transaction has started the cardholder should insert, swipe or tap his card for the transaction to be processed. Depending on the type of card and outcome of the transaction different screens and instructions will appear.
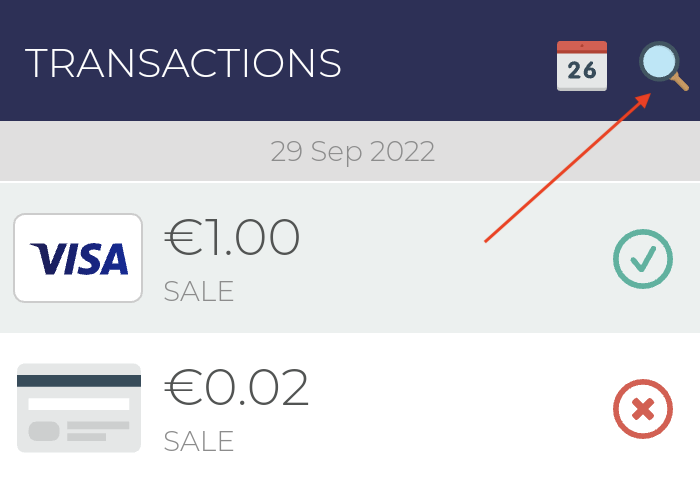
Transactions History Tab
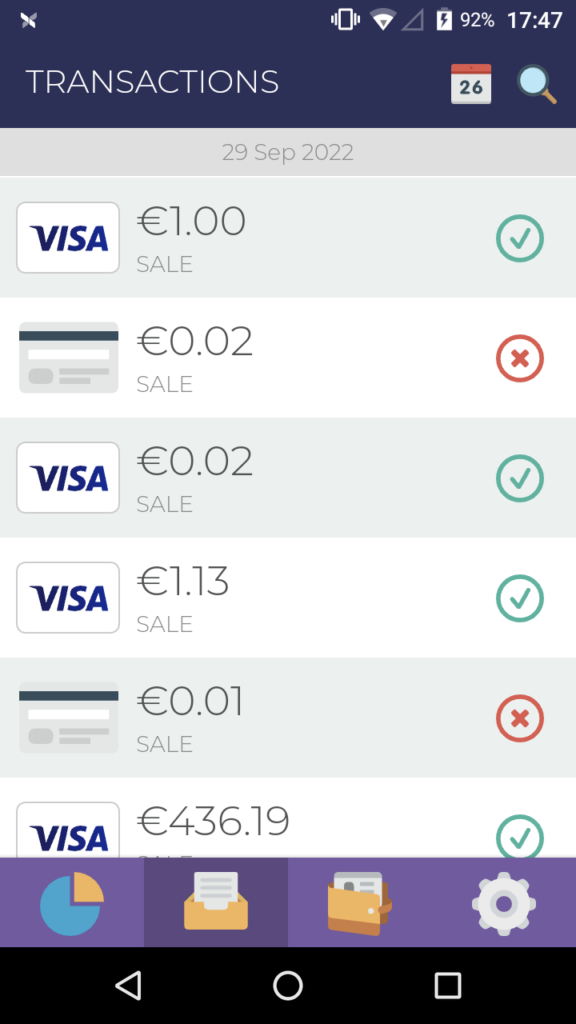
In the transaction history tab you will be able to find all the details of your transactions. Transactions are ordered chronologically with the most recent one at the top.

The transaction history is also the place where you will be able to start refunds and reversals as well as re-printing or sending digital receipts.
To choose a specific timeframe selectcalendar icon on top of the screen. This way you can quickly access transactions made in the past.
The magnifying glass on top of the screen icon allows the app user to filter transactions by id, amount, card number or any other parameter available on the receipt of the transaction.
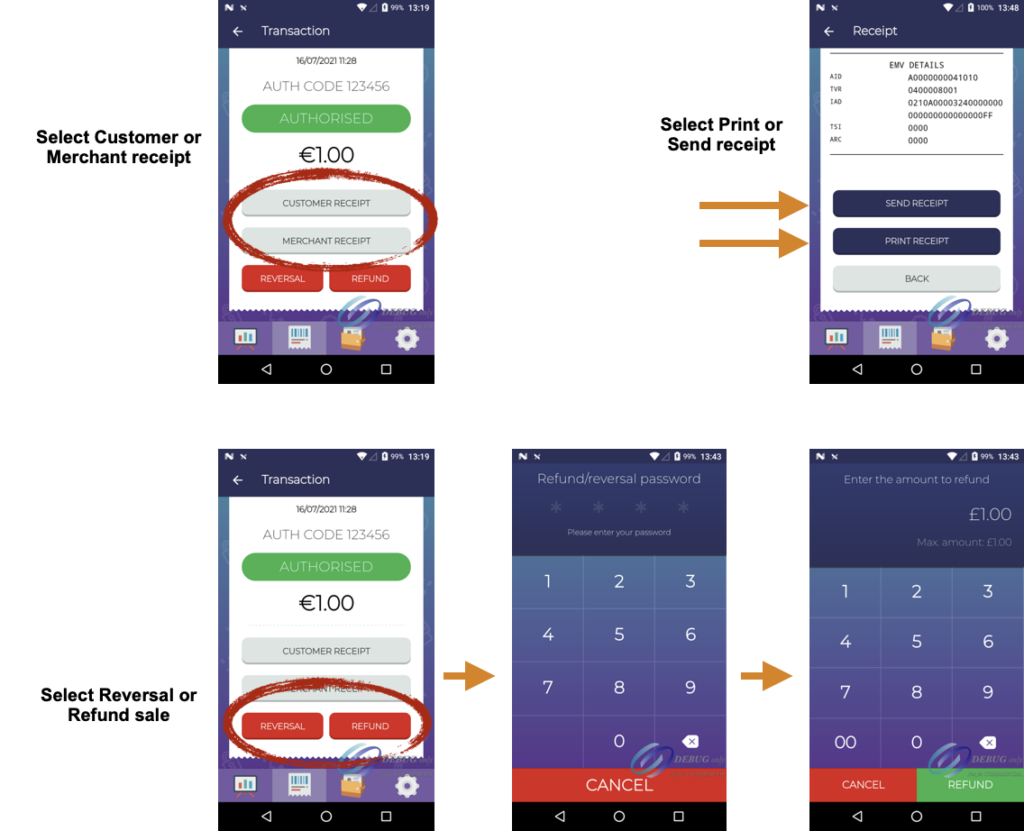
Transactions Details
When clicking on a specific transaction you can access its details which include the customer and merchant receipts as well as the possibility to start a refund or a reversal.
A reversal does not require a card to be present and will reverse the original transaction. A reversal can only be done before the transactions are funded by the acquirer (usually on the same day). If a reversal is sent several days after the original transaction, it is very likely to be declined.
A refund does require a card to be inserted and can be done at any time after the original transaction. Based on the settings set by the service provider, the refund option might not appear in the application.
Clicking on the customer or merchant receipt button allows to print a duplicate receipt or send a receipt via email or SMS.
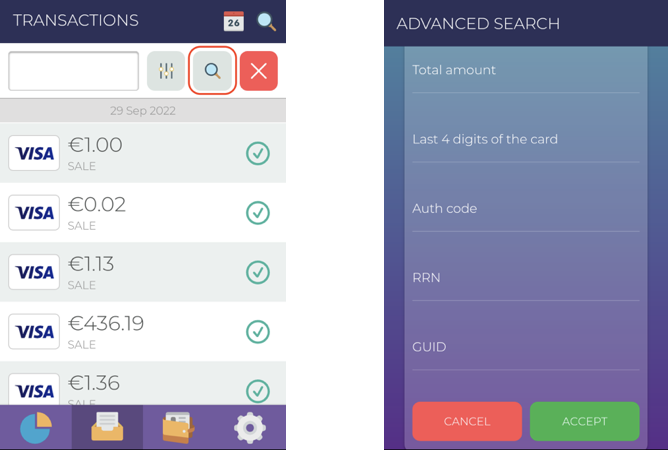
Transactions Filter
Transactions filter allows to find any specific transaction by Transaction ID, amount, card number or any other parameter available on the receipt of the transaction.
Advanced search
With an advanced search button, you can search a transaction by specific field (Amount, Authorization Code, Last 4 digits of the Card Number, GUID, and RRN).
The user can fill in one or more parameters. Not filled specifications will be ignored and the search will be done with the matches of the filled sections.
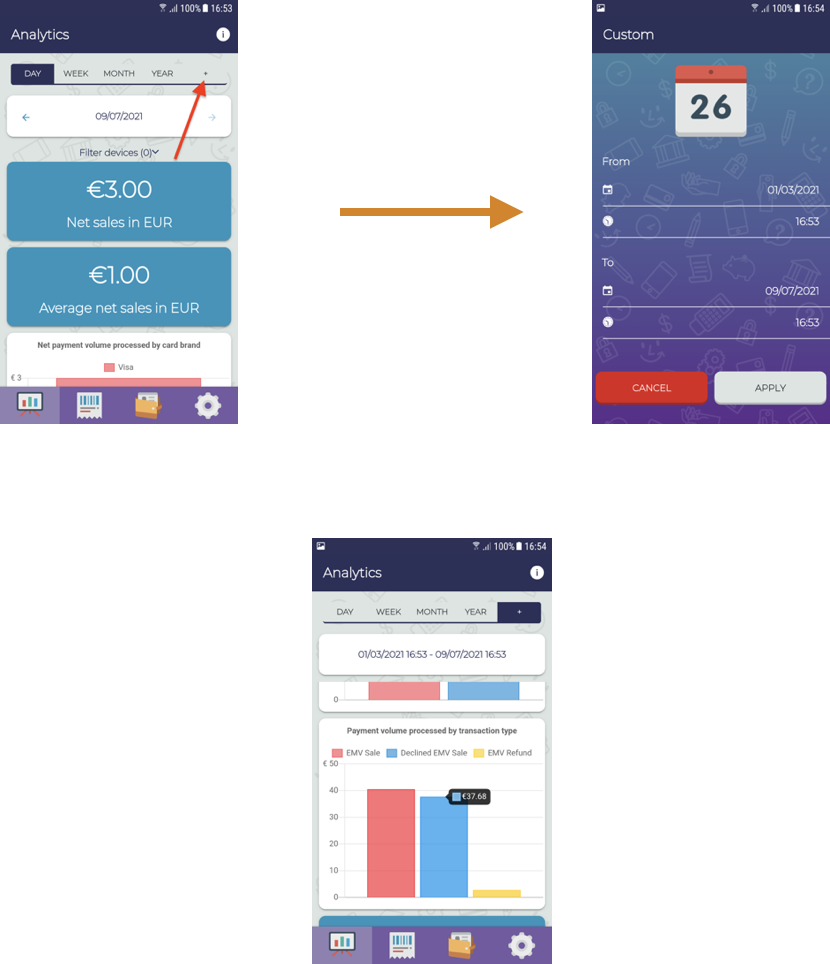
Analytics Tab
The Analytics tab gives you deep insights about your transactions.

Information available for any time period includes:
- The number and amount of transactions
- The average charge
- The breakdown of transactions by card brand
- The breakdown of transactions by type (sale, reversal, refund, etc.).
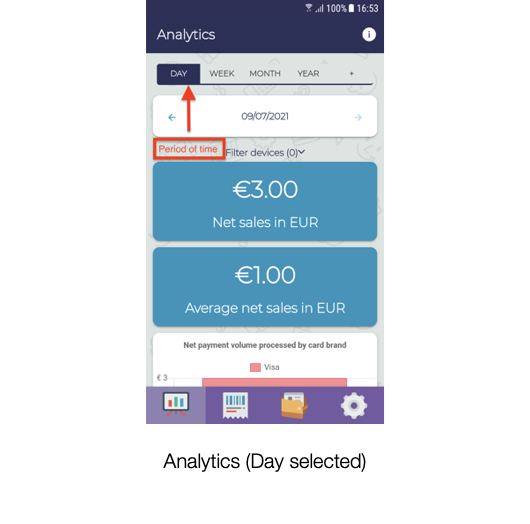
It is possible to select a custom timeframe. To do so click on the “+” button at the top right and using a date picker select the custom timeframe.
Settings Tab
The settings tab is the place where you can adjust different parameters from printing options to language settings and payment methods.
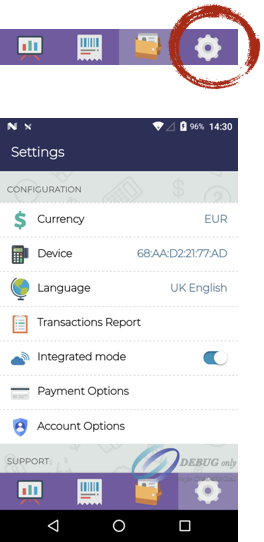
- Currency: If you chose than one currency, in this section you will be able to switch it.
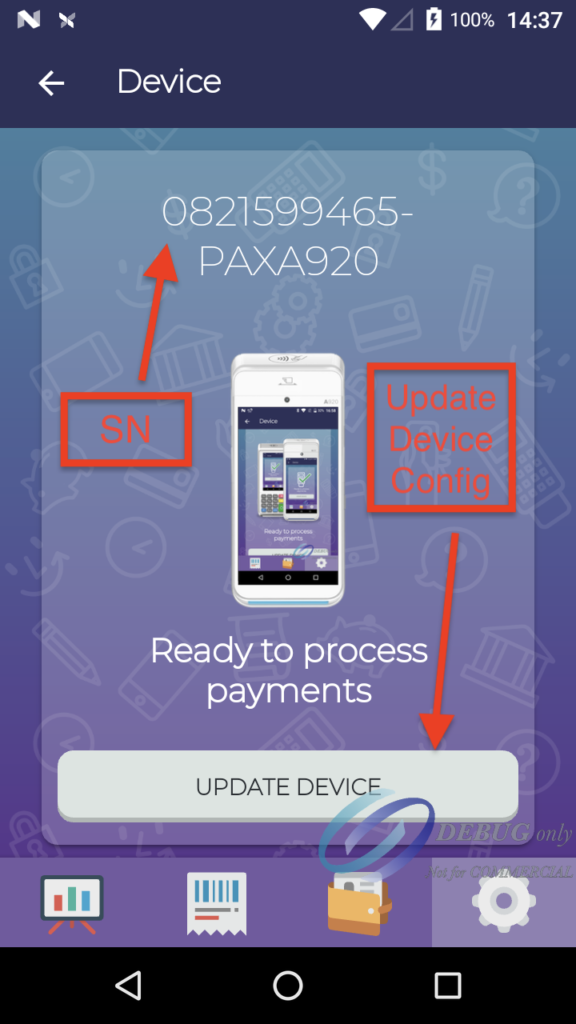
- Device: Here you will find software or configuration updates. This menu also shows the status of the terminal and if it is correctly connected to the payment application.
- Language: Enables you to change the language of the terminal to your preference.
- Transaction Report: View and print a report of the transactions made on the terminal for a specific timeframe.
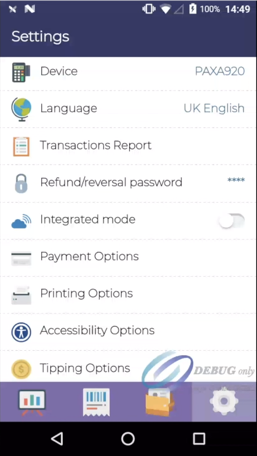
- Refund/Reversal Password: Change the password that was initially set upon initial configuration.
Note: If you do not remember the initial password configured, contact us to reset it remotely.
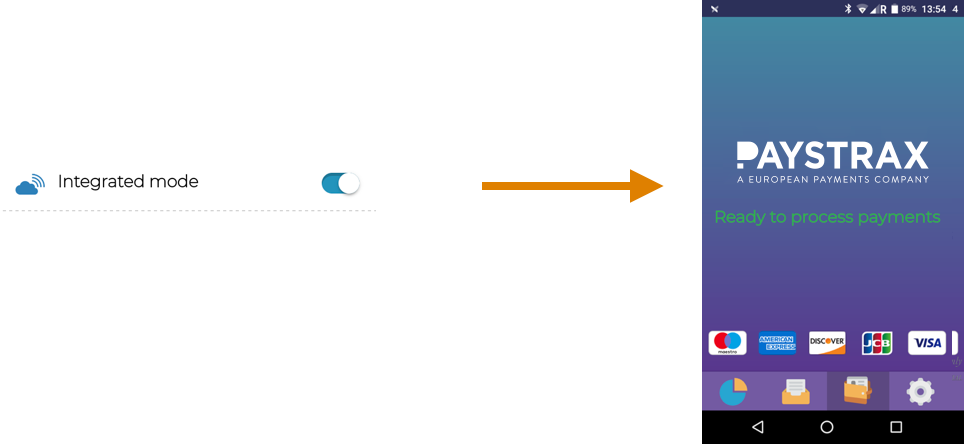
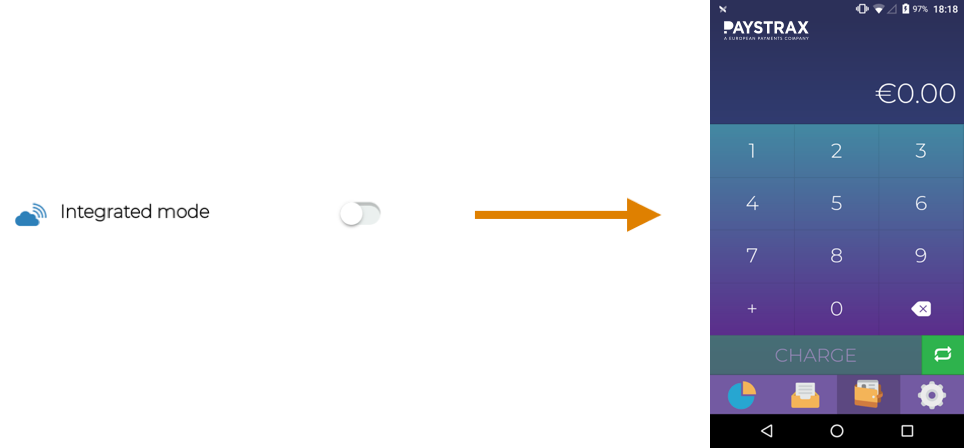
- Integrated Mode (Toggle): It allows us to switch between Integrated Mode and Standalone Mode. Integrated mode is used to communicate with 3rd party POS software and is not an option available for standalone merchants.
- Payment Options: Enable or disable different payment options:
- Card payment is enabled by default.
- Signature is enabled by default. If a card requires a signature as a verification method, a digital signature screen will appear on the terminal for the cardholder to sign before the transaction is authorised. Disabling this setting will prevent the terminal from requesting a signature if the card requires one. Depending on your geographical region, the card brands may have made the signature optional, allowing you to safely disable this functionality.
- Cash payment is enabled by default and allows to keep a record of payments received in cash.
- Other payments are enabled by default and allow to keep a record of payments received. (voucher, checks, etc…)
- Printing Options: Enables automatic or manual printing of the merchant and customer receipts. If receipts are not printed automatically, a menu with buttons will appear at the end of the transaction to manually print receipts if required by the cardholder.
To be able to print with a larger font than the default, you have to perform the following steps:
Go to Device Settings → Enter the password → Go to the Display section–> Font size (select a larger font). By modifying this option, the font size will be increased as well as the font that appears on receipts.
- Accessibility Options: Allows to enable/disable PIN bypass during a transaction. The cardholder can bypass the PIN by clicking one time on the validate (green) button of the PIN screen. The transaction will be proceed without pin insertion and the transaction will be sent online for verification by the bank. This feature is implemented to help visually impaired and handicapped people make transactions.
- Tipping Options: Allows to enable/disable tipping at the time of the sale. If tipping is enabled, a new payment method called Card and tip will appear after entering an amount with the keypad and clicking pay. Selecting Card and tip will prompt the cardholder to select a tipping percentage or custom tip amount before the transaction starts.
- Account Options: Allows to delete merchant account. An email will be sent to our support team to process the deactivation.
- FAQ: A QR code will be displayed, redirecting the user to the Support Center.
Pre-Authorisation
Available from version 4.4.1 or higher of the Payments app.
A Pre-Authorisation charge ( or pre-auth or authorization hold) is a temporary hold placed on a customer’s payment card. It’s used to verify that the account is valid and has sufficient funds to cover a pending transaction, without actually debiting the cardholder’s account upfront.
A pre-authorised transaction can be increased or decreased (Pre-Auth Increase), can be captured (Pre-Auth Capture) and can be fully released (Pre-Auth Reversal).
NOTE: To be able to use Pre-Auth, the option “Enable pre-auth for the merchant” must be activated on the merchant profile in TMS (Terminal Management System).

If you have questions regarding the activation of this feature in TMS, please contact us.
For the Pre-Auth functionality to be visible in the payment application it must be in standalone mode (as opposed to integrated mode).
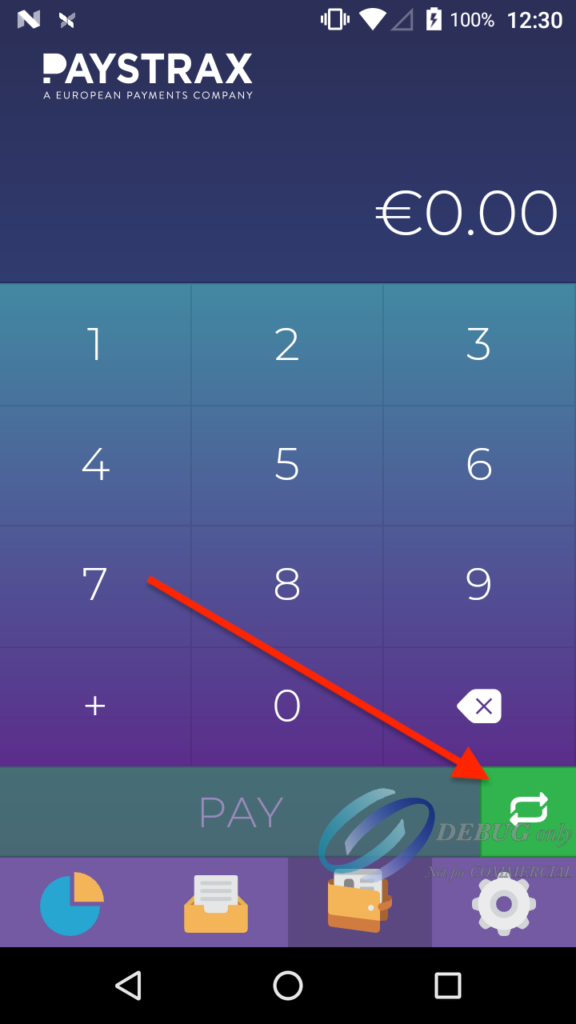
The digital keypad is your starting point to take Pre-Authorisations.

By default, the payment application has Card Present transactions activated. To use Pre-Auth, you need to click on the switch button.
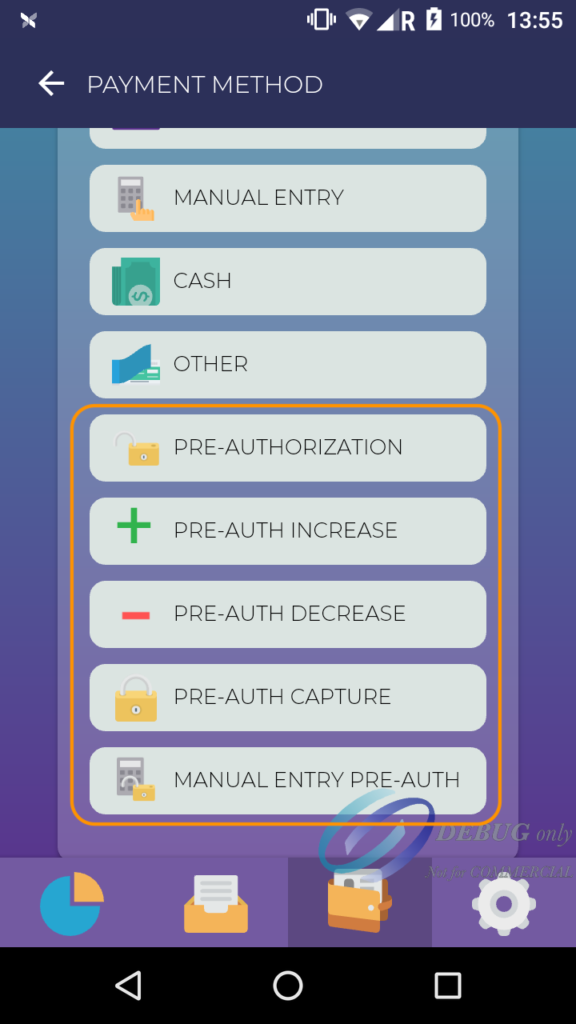
Multiple payment methods will appear, to start a Pre-Auth (Pre-Authorisation, Pre-Auth Increase, Pre-Auth Decrease, Pre-Auth Capture). Pre-Auth Reversal will be possible by locating a Pre-Auth transaction in the Transaction History of the app.
Please select the desired option.
Pre-Authorisation
The purpose of this verification is to confirm the legitimacy of the account and ascertain that there are sufficient funds available to cover the pending transaction. This is achieved without debiting the cardholder’s account immediately.
Pre-Authorisation Increase/Decrease
A pre-authorised transaction can be increased or decreased, for example, if a tab was opened and the consumer is adding new orders going above the initial amount.
- Increase (A Pre-Authorisation Increase does not require a card to be inserted, swiped or tapped)
- Decrease (A Pre-Authorisation Decrease does not require a card to be inserted, swiped or tapped)
Pre-Authorisation Capture
A pre-authorised transaction can be captured to debit the cardholder’s account. Depending on your category code, the capture needs to happen between 7 and 31 days after the original pre-authorisation. If not captured, the funds will be automatically released by the issuing bank.
(A Pre-Authorisation Capture does not require a card to be inserted, swiped or tapped)
Pre-Authorisation Reversal
A pre-authorised transaction can be fully released, for example, when renting a car, the pre-auth reversal allows to release the funds if the car returned is not damaged. The merchant password will be requested at that point.
(A Pre-Authorisation Reversal does not require a card to be inserted, swiped or tapped)
Kiosk mode
Kiosk mode enables the navigation within the payment application to be restricted behind a merchant password. In kiosk mode, the user is restricted to making a payment and is unable to navigate outside of the application.
Enable Kiosk Mode
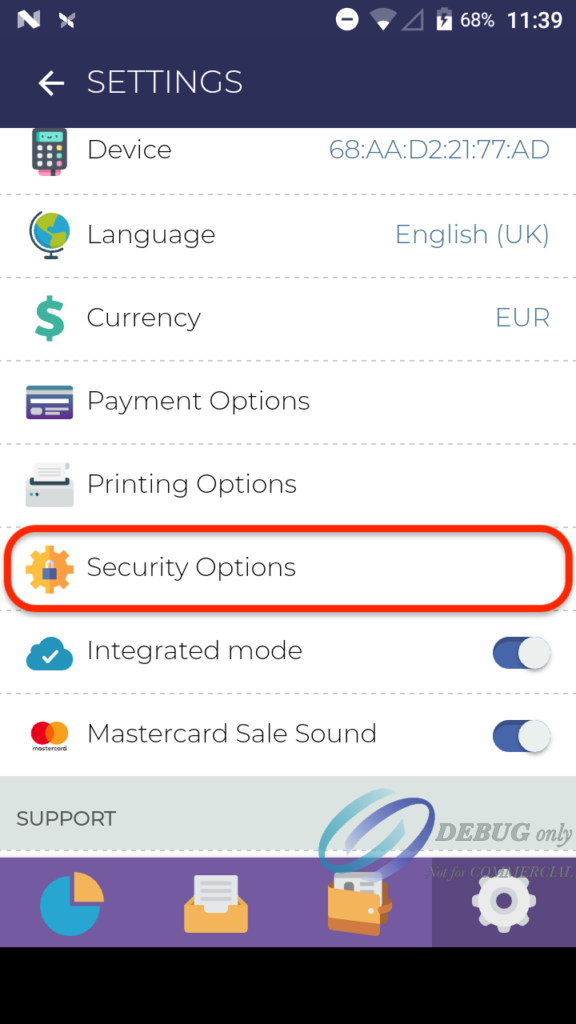
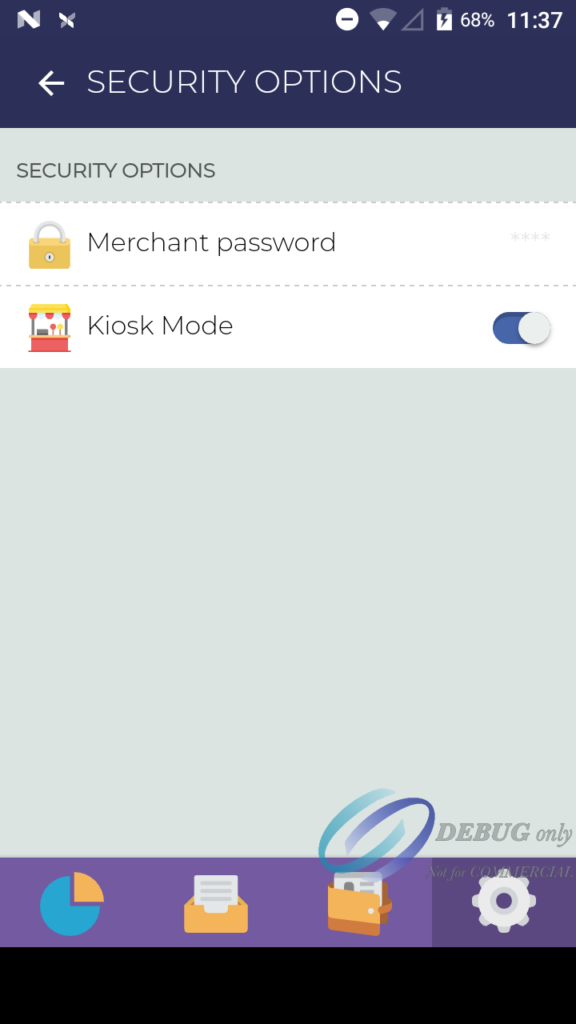
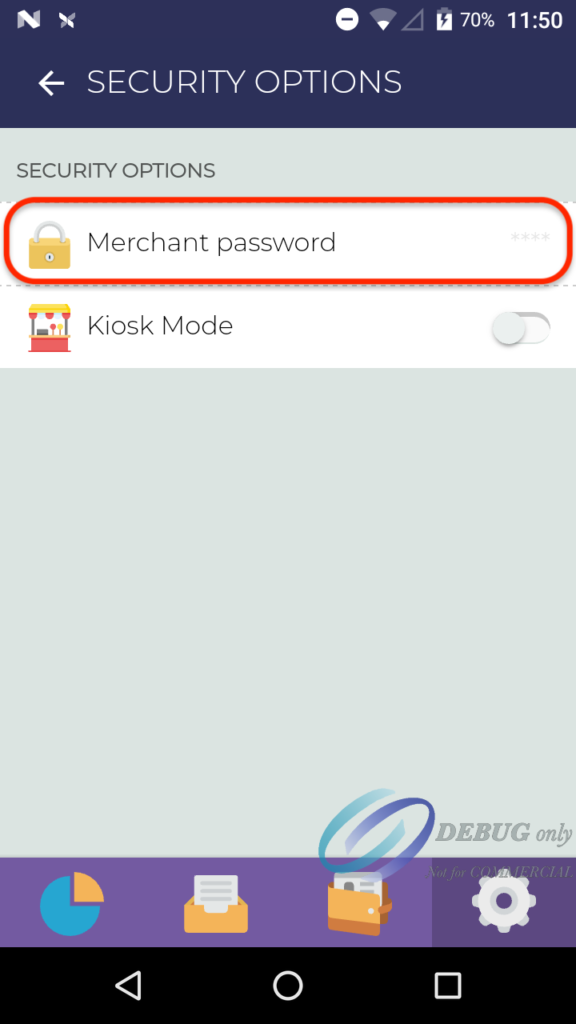
To enable kiosk mode go to the Settings tab (cogwheel). There you will find an option called Security Options. Click on it and enable kiosk mode and/or change your merchant password.
Once the kiosk mode has been activated, the three Android native buttons will be hidden, preventing the user from minimising the app and closing it. Furthermore, users will be unable to navigate between the menus of the application, which can usually be found at the bottom of the screen.
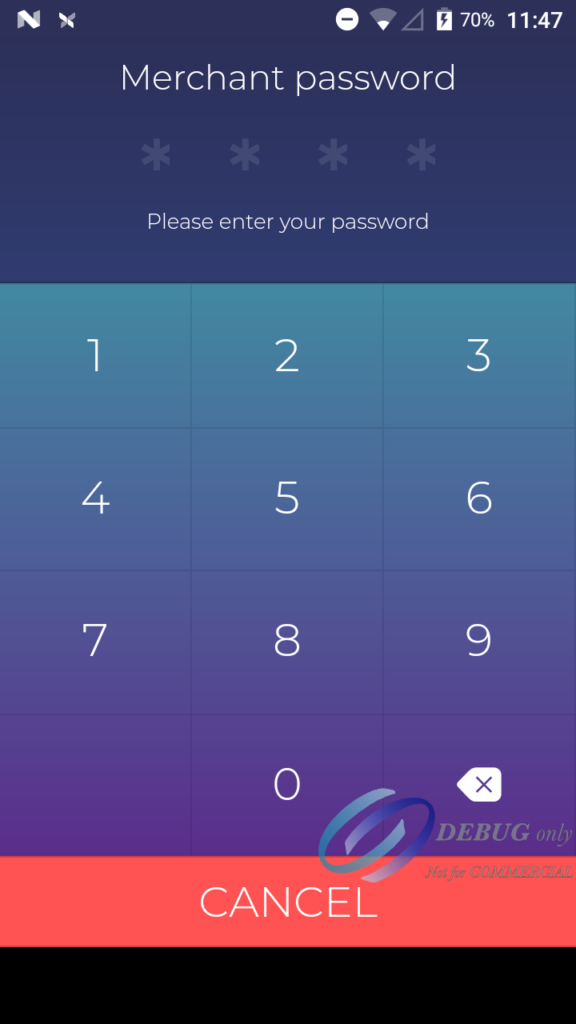
When clicking on the Settings, Analytics or Transactions tab, the merchant password will be required.
How can I change the merchant password?
To change the password, go to the Settings tab (cogwheel) and click on Security Options.
Click on the Merchant password option and change your password. Note, that the old password will be required.
If the old password is forgotten, contact us to reset it remotely.
Duplicate Payment check
New feature in our payment application (v4.0.1) – duplicate payment check.
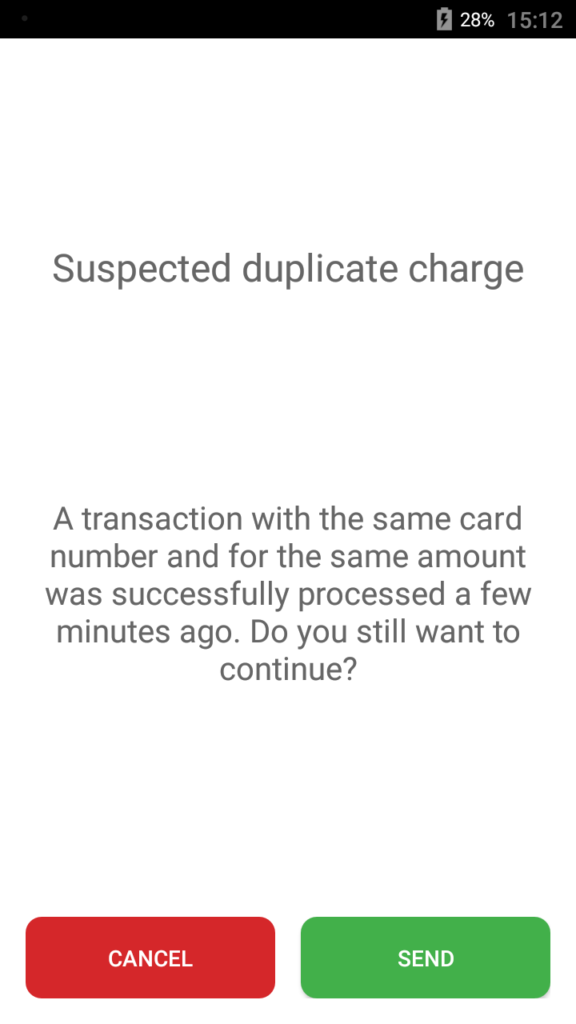
If a merchant is unsure about a transaction, usually they will reprocess it. This can result in the cardholder being charged twice. To avoid this, we are flagging duplicate transactions and prompting the cardholder or merchant to confirm or cancel the second charge.
We are only prompting the duplicate menu in case the same card is used twice in a row to process a transaction for the same amount within a 5 minute timeframe. The duplicate payment check feature will be enabled by default in the payment application v4.0.1.
For the application in Standalone Mode, the duplicate check feature can be disabled through the settings of the application. To disable this functionality, go to app Settings → Payment Options → Switch off the Duplicate charge alert.
If the application is used in Integrated Mode, the duplicate payment check feature will be enabled by default in the payment application 4.0.1. If you are using the REST API, Windows SDK, Android SDK or JS SDK and want to disable this feature, a duplicate check flag will be available in the sale options.
How to activate a SIM card
In instances where Wi-Fi connectivity is unreliable or unavailable, the use of SIM cards* can provide a viable alternative for data connectivity.
If you are using our provided SIM cards, here are the steps to activate them:
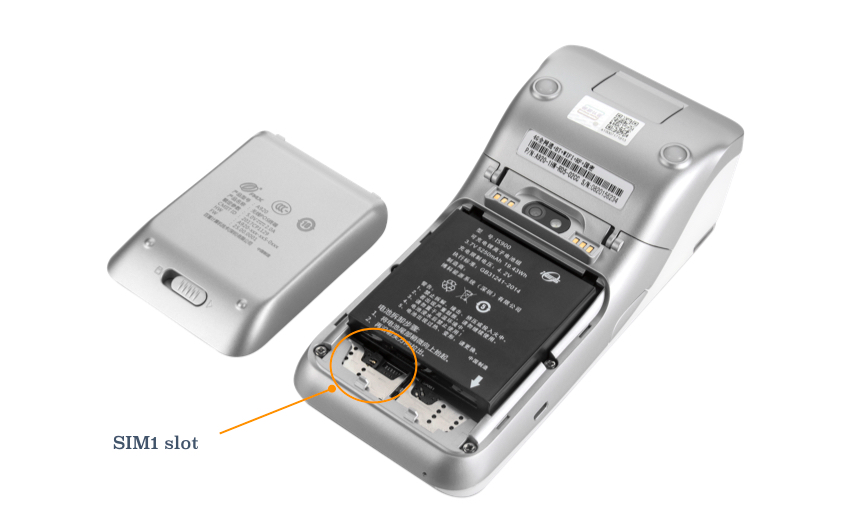
- Push the battery cover slide latch (at the back of the card reader) to the right to open, remove the battery case (lifting from the bottom) and take out the battery (also lifting from the bottom). Insert the SIM card in the SIM1 card slot (on the left-hand side) [Step 1 can be skipped if the SIM card is already inserted]
- Turn on the terminal and connect it the terminal to the Wi-Fi.
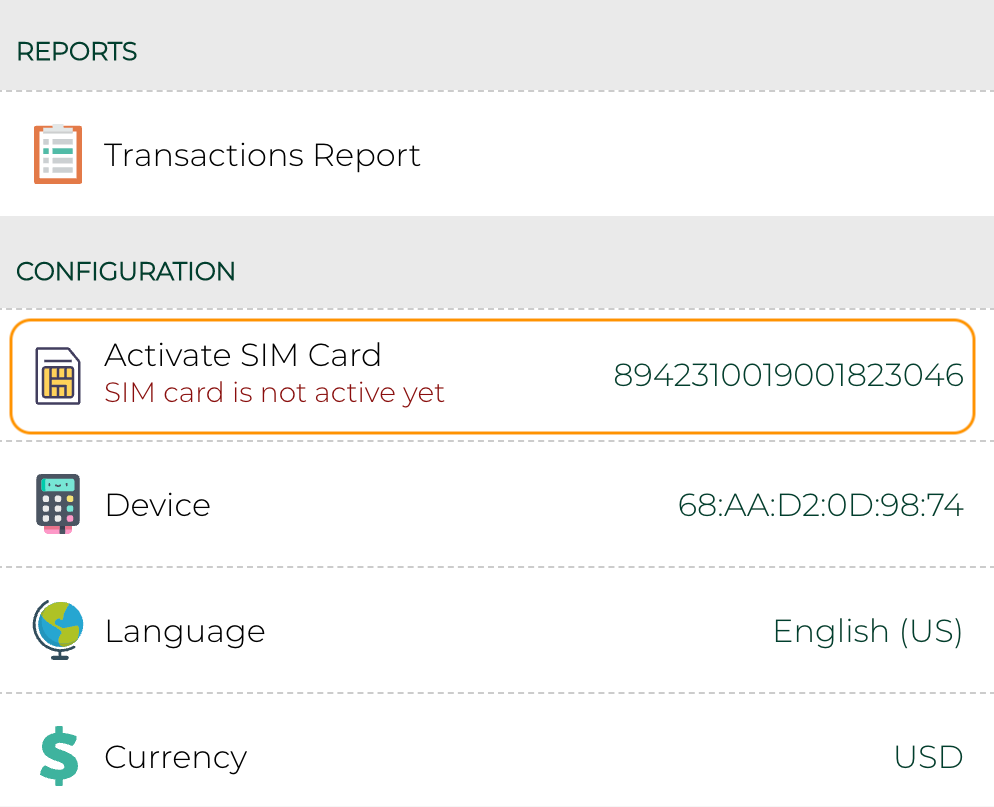
- Open the Payments app and go to the app Settings (cogwheel).
- Click the “activate sim card” button (might require scrolling down a bit).
- At this time the device should be able to be used only with the SIM card.
If you have carried out the previous steps and the connectivity with SIM cards does not work correctly, we recommend carrying out the following checks:
- Make sure cellular is enabled on the payment terminal: Go to the Android settings -> More -> Cellular Networks -> click the check box near “Data roaming”
- Make sure that 3G/4G is not selected as the preferred network in the device settings. You can check it by going to device settings Wireless —> Networks —> Mobile networks —> Preferred network type —> 4G preferred (These steps may vary a bit depending on the version of PAX used).
In case you are not using our provided SIM cards, here are the steps to follow:
- Push the battery cover slide latch (at the back of the card reader) to the right to open, remove the battery case (lifting from the bottom) and take out the battery (also lifting from the bottom). Insert the SIM card in the SIM1 card slot (on the left-hand side)
- Make sure cellular is enabled on the payment terminal : Go to the Android settings -> More -> Cellular Networks -> click the check box near “Data roaming”
- Make sure that 3G/4G is not selected as the preferred network in the device settings. You can check it by going to device settings Wireless —> Networks —> Mobile networks —> Preferred network type —> 4G preferred (These steps may vary a bit depending on the version of PAX used).
- Make sure that the SIM APN settings [Device settings Wireless —> Networks —> Mobile networks —> Access Point Names] are correctly set up on the terminal.
- Make sure that the SIM inserted in the terminal still has data available for transactions.
- If the merchant has a not very reliable Wi-Fi, perhaps the best option would be to forget the Wi-Fi network to prevent the device from connecting to this network since the PAX considers Wi-Fi as primary before the SIM card connection. Forgetting the merchant’s known network, the device will only use the SIM card, ensuring a better internet connection.
*Before purchasing, check if your PAX reader supports the use of SIM card.